Gradio 智能体 & MCP 黑客马拉松
获奖者
Gradio 智能体 & MCP 黑客马拉松
获奖者 %20Copyright%202022%20Fonticons,%20Inc.%20--%3e%3cpath%20d='M172.5%20131.1C228.1%2075.51%20320.5%2075.51%20376.1%20131.1C426.1%20181.1%20433.5%20260.8%20392.4%20318.3L391.3%20319.9C381%20334.2%20361%20337.6%20346.7%20327.3C332.3%20317%20328.9%20297%20339.2%20282.7L340.3%20281.1C363.2%20249%20359.6%20205.1%20331.7%20177.2C300.3%20145.8%20249.2%20145.8%20217.7%20177.2L105.5%20289.5C73.99%20320.1%2073.99%20372%20105.5%20403.5C133.3%20431.4%20177.3%20435%20209.3%20412.1L210.9%20410.1C225.3%20400.7%20245.3%20404%20255.5%20418.4C265.8%20432.8%20262.5%20452.8%20248.1%20463.1L246.5%20464.2C188.1%20505.3%20110.2%20498.7%2060.21%20448.8C3.741%20392.3%203.741%20300.7%2060.21%20244.3L172.5%20131.1zM467.5%20380C411%20436.5%20319.5%20436.5%20263%20380C213%20330%20206.5%20251.2%20247.6%20193.7L248.7%20192.1C258.1%20177.8%20278.1%20174.4%20293.3%20184.7C307.7%20194.1%20311.1%20214.1%20300.8%20229.3L299.7%20230.9C276.8%20262.1%20280.4%20306.9%20308.3%20334.8C339.7%20366.2%20390.8%20366.2%20422.3%20334.8L534.5%20222.5C566%20191%20566%20139.1%20534.5%20108.5C506.7%2080.63%20462.7%2076.99%20430.7%2099.9L429.1%20101C414.7%20111.3%20394.7%20107.1%20384.5%2093.58C374.2%2079.2%20377.5%2059.21%20391.9%2048.94L393.5%2047.82C451%206.731%20529.8%2013.25%20579.8%2063.24C636.3%20119.7%20636.3%20211.3%20579.8%20267.7L467.5%20380z'/%3e%3c/svg%3e)
在本指南中,我们将演示使用 Gradio 和 Comet 的几种方法。我们将介绍 Comet 与 Gradio 结合使用的基础知识,并向您展示如何利用 Gradio 的高级功能,例如iFrames 嵌入和状态管理来构建出色的模型评估工作流。
以下是本指南涵盖的主题列表。
Comet 是一个 MLOps 平台,旨在帮助数据科学家和团队更快地构建更好的模型!Comet 提供工具,可在单一位置跟踪、解释、管理和监控您的模型!它与 Jupyter Notebook 和脚本兼容,最重要的是它 100% 免费!
首先,安装运行这些示例所需的依赖项
pip install comet_ml torch torchvision transformers gradio shap requests Pillow接下来,您需要注册一个 Comet 帐户。设置好帐户后,获取您的 API 密钥并配置您的 Comet 凭据。
如果您将这些示例作为脚本运行,可以将凭据导出为环境变量
export COMET_API_KEY="<Your API Key>"
export COMET_WORKSPACE="<Your Workspace Name>"
export COMET_PROJECT_NAME="<Your Project Name>"
或者将它们设置在工作目录中的 .comet.config 文件中。您的文件应按以下方式格式化。
[comet]
api_key=<Your API Key>
workspace=<Your Workspace Name>
project_name=<Your Project Name>
如果您使用提供的 Colab Notebook 来运行这些示例,请在启动 Gradio UI 之前运行包含以下代码片段的单元格。运行此单元格可让您交互式地将 API 密钥添加到 Notebook 中。
import comet_ml
comet_ml.init()![]()
在此示例中,我们将介绍如何将 Gradio 应用程序记录到 Comet,并使用 Gradio 自定义面板与其交互。
让我们首先使用 resnet18 构建一个简单的图像分类示例。
import comet_ml

import requests
import torch
from PIL import Image
from torchvision import transforms

torch.hub.download_url_to_file("https://github.com/pytorch/hub/raw/master/images/dog.jpg", "dog.jpg")

if torch.cuda.is_available():
    device = "cuda"
else:
    device = "cpu"

model = torch.hub.load("pytorch/vision:v0.6.0", "resnet18", pretrained=True).eval()
model = model.to(device)

# Download human-readable labels for ImageNet.
response = requests.get("https://git.io/JJkYN")
labels = response.text.split("\n")


def predict(inp):
    inp = Image.fromarray(inp.astype("uint8"), "RGB")
    inp = transforms.ToTensor()(inp).unsqueeze(0)
    with torch.no_grad():
        prediction = torch.nn.functional.softmax(model(inp.to(device))[0], dim=0)
    return {labels[i]: float(prediction[i]) for i in range(1000)}


inputs = gr.Image()
outputs = gr.Label(num_top_classes=3)

io = gr.Interface(
    fn=predict, inputs=inputs, outputs=outputs, examples=["dog.jpg"]
)
io.launch(inline=False, share=True)

experiment = comet_ml.Experiment()
experiment.add_tag("image-classifier")

io.integrate(comet_ml=experiment)
此代码片段中的最后一行会将 Gradio 应用程序的 URL 记录到您的 Comet 实验中。您可以在实验的“文本”选项卡中找到该 URL。
将 Gradio 面板添加到您的实验中以与您的应用程序交互。
如果您永久托管 Gradio 应用程序,可以使用 Gradio Panel Extended 自定义面板嵌入 UI。
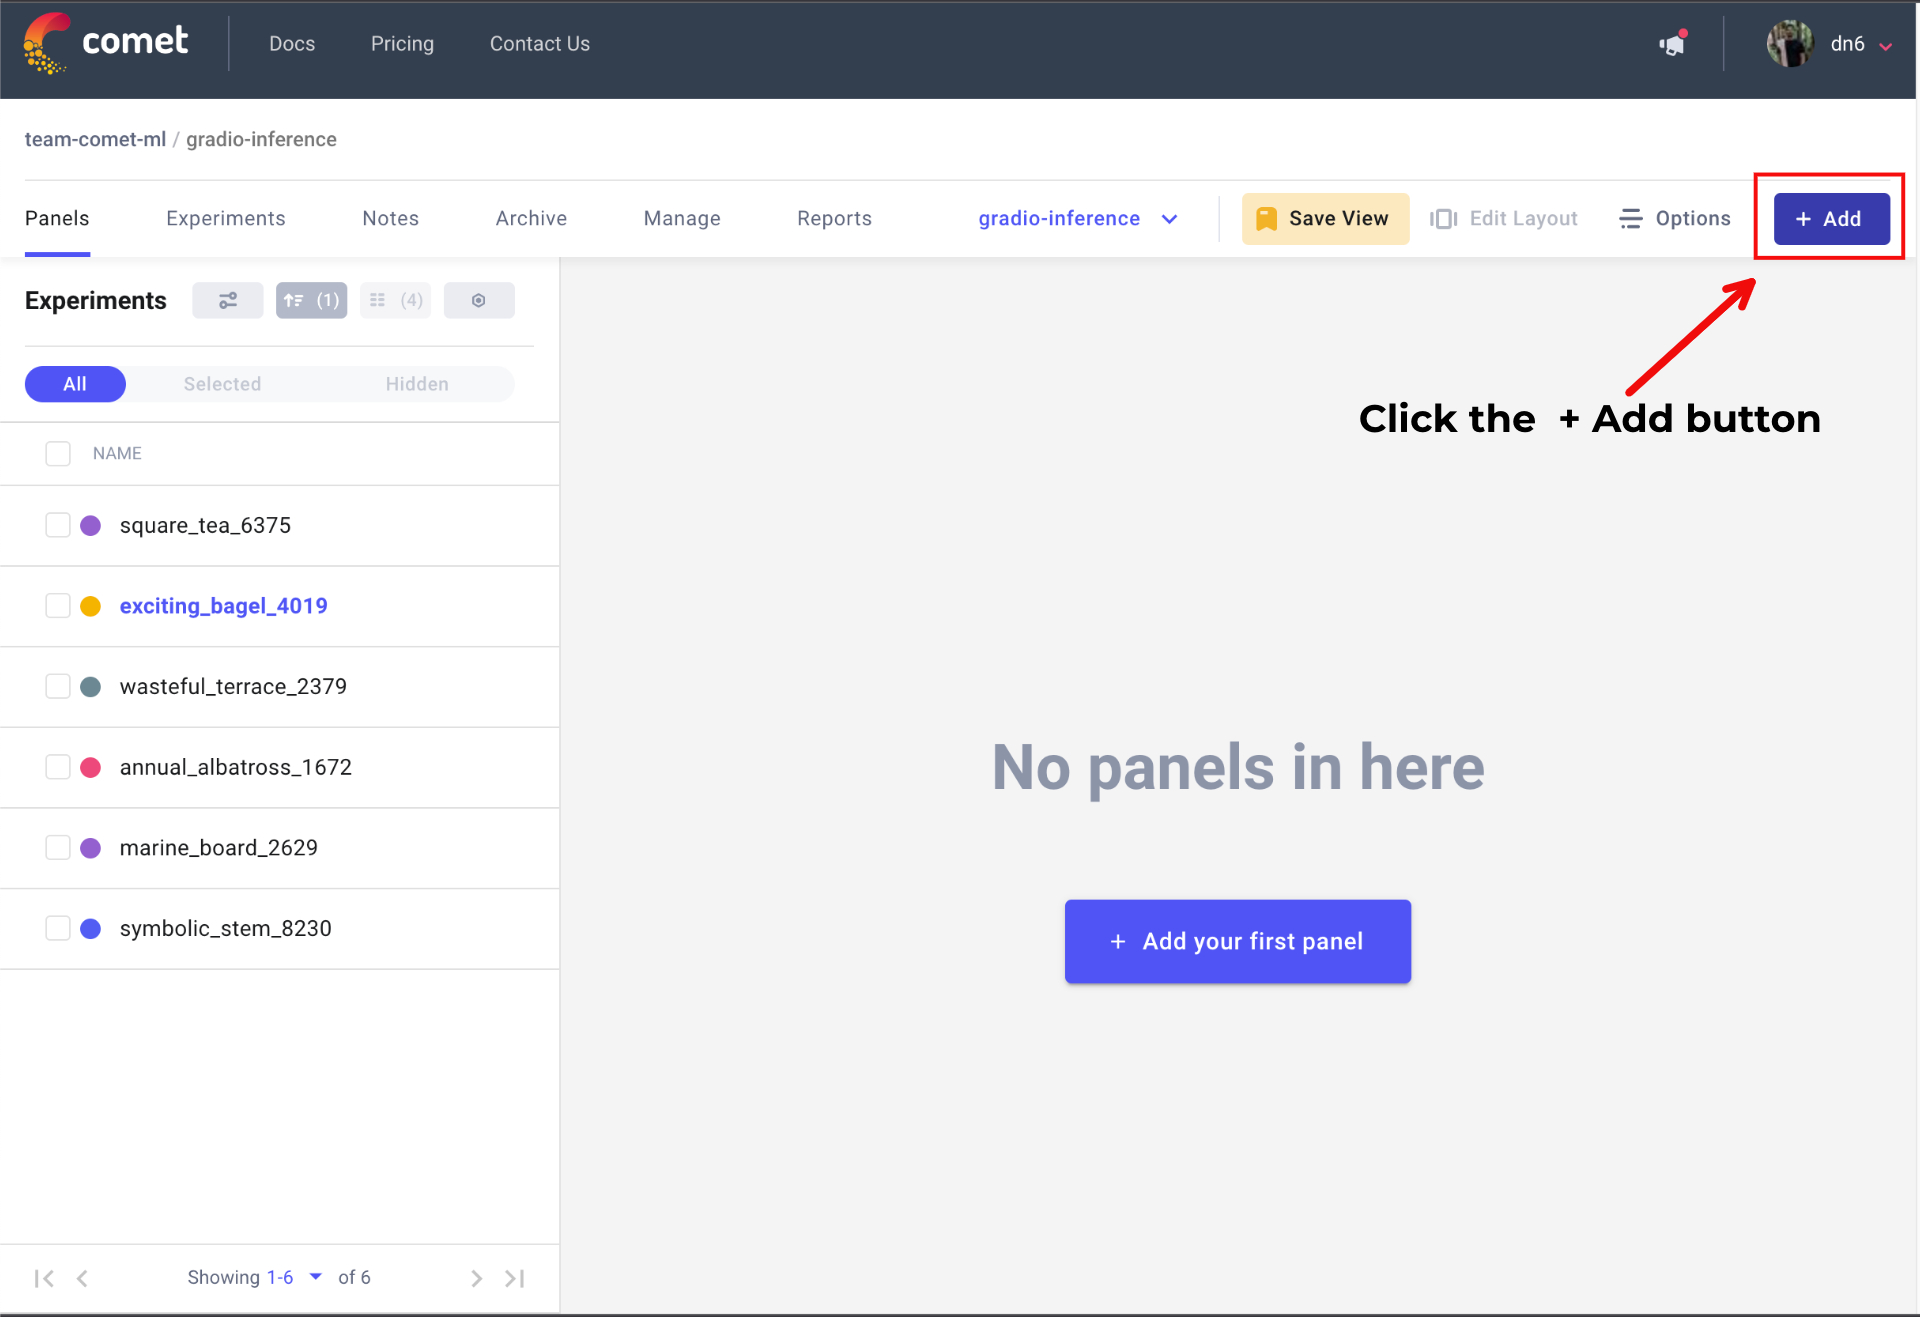
转到您的 Comet 项目页面,然后前往“面板”选项卡。单击 + 添加 按钮以调出“面板搜索”页面。
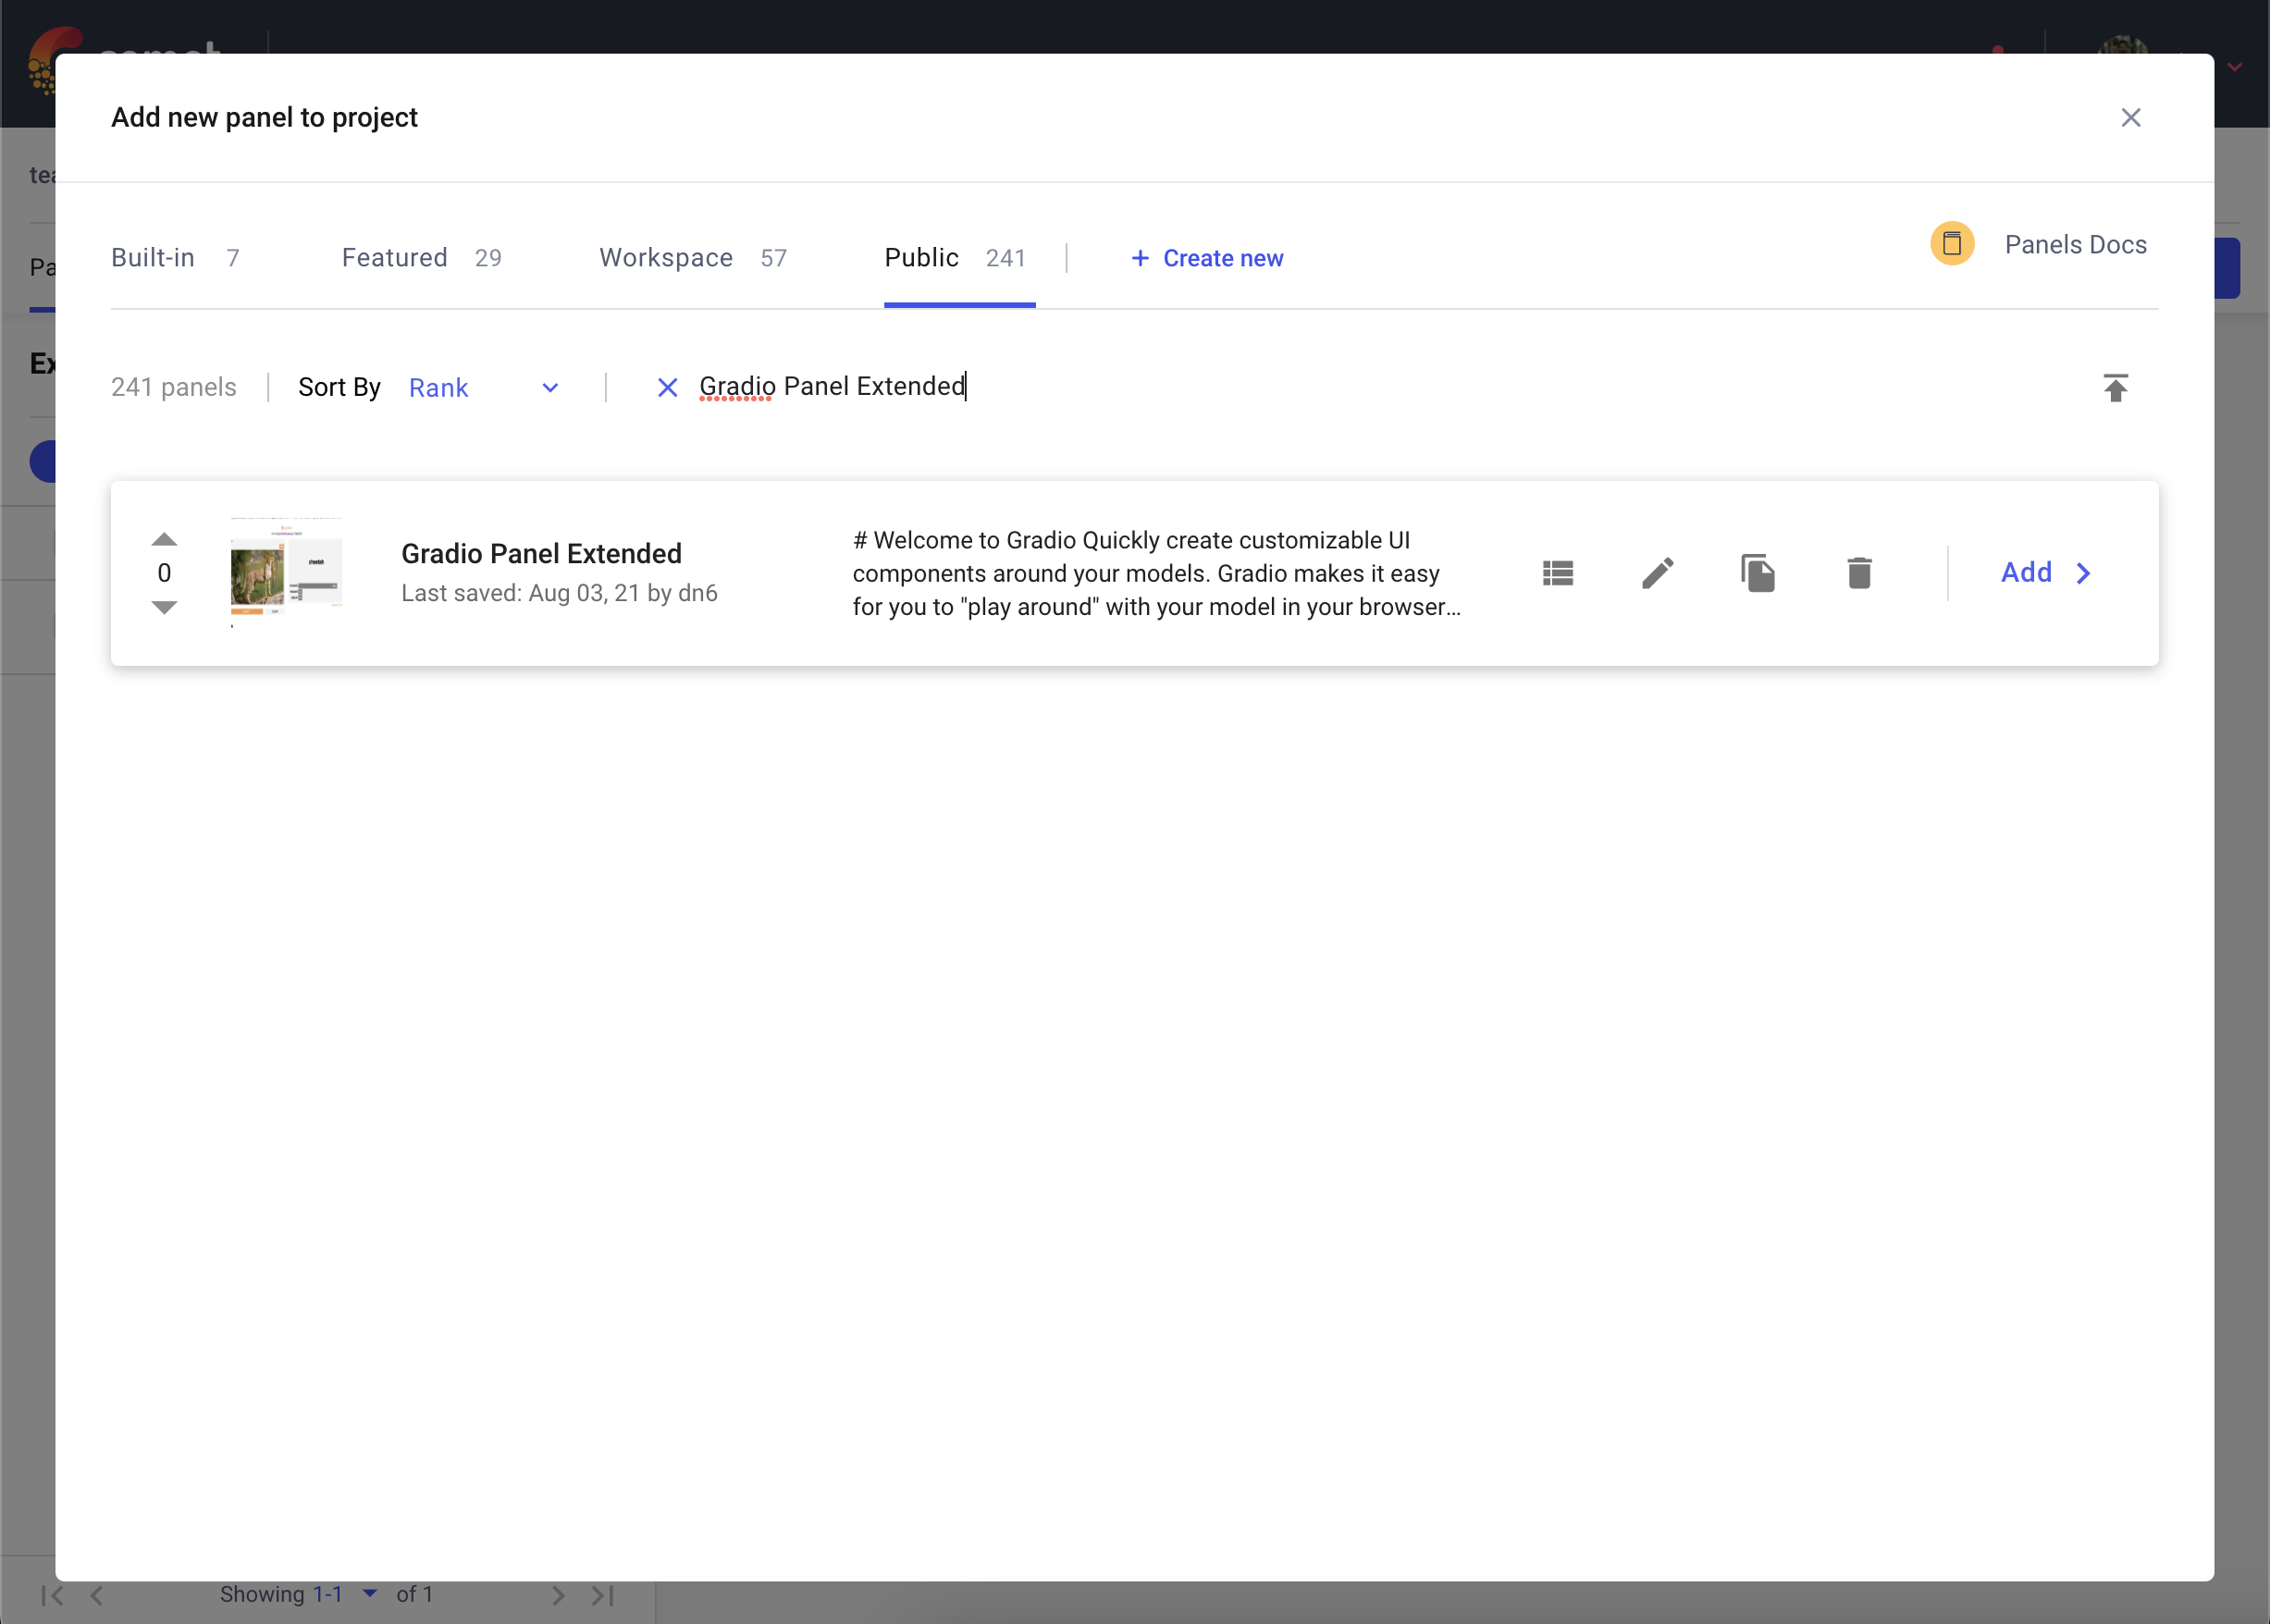
接下来,在“公共面板”部分搜索“Gradio Panel Extended”,然后单击 添加。
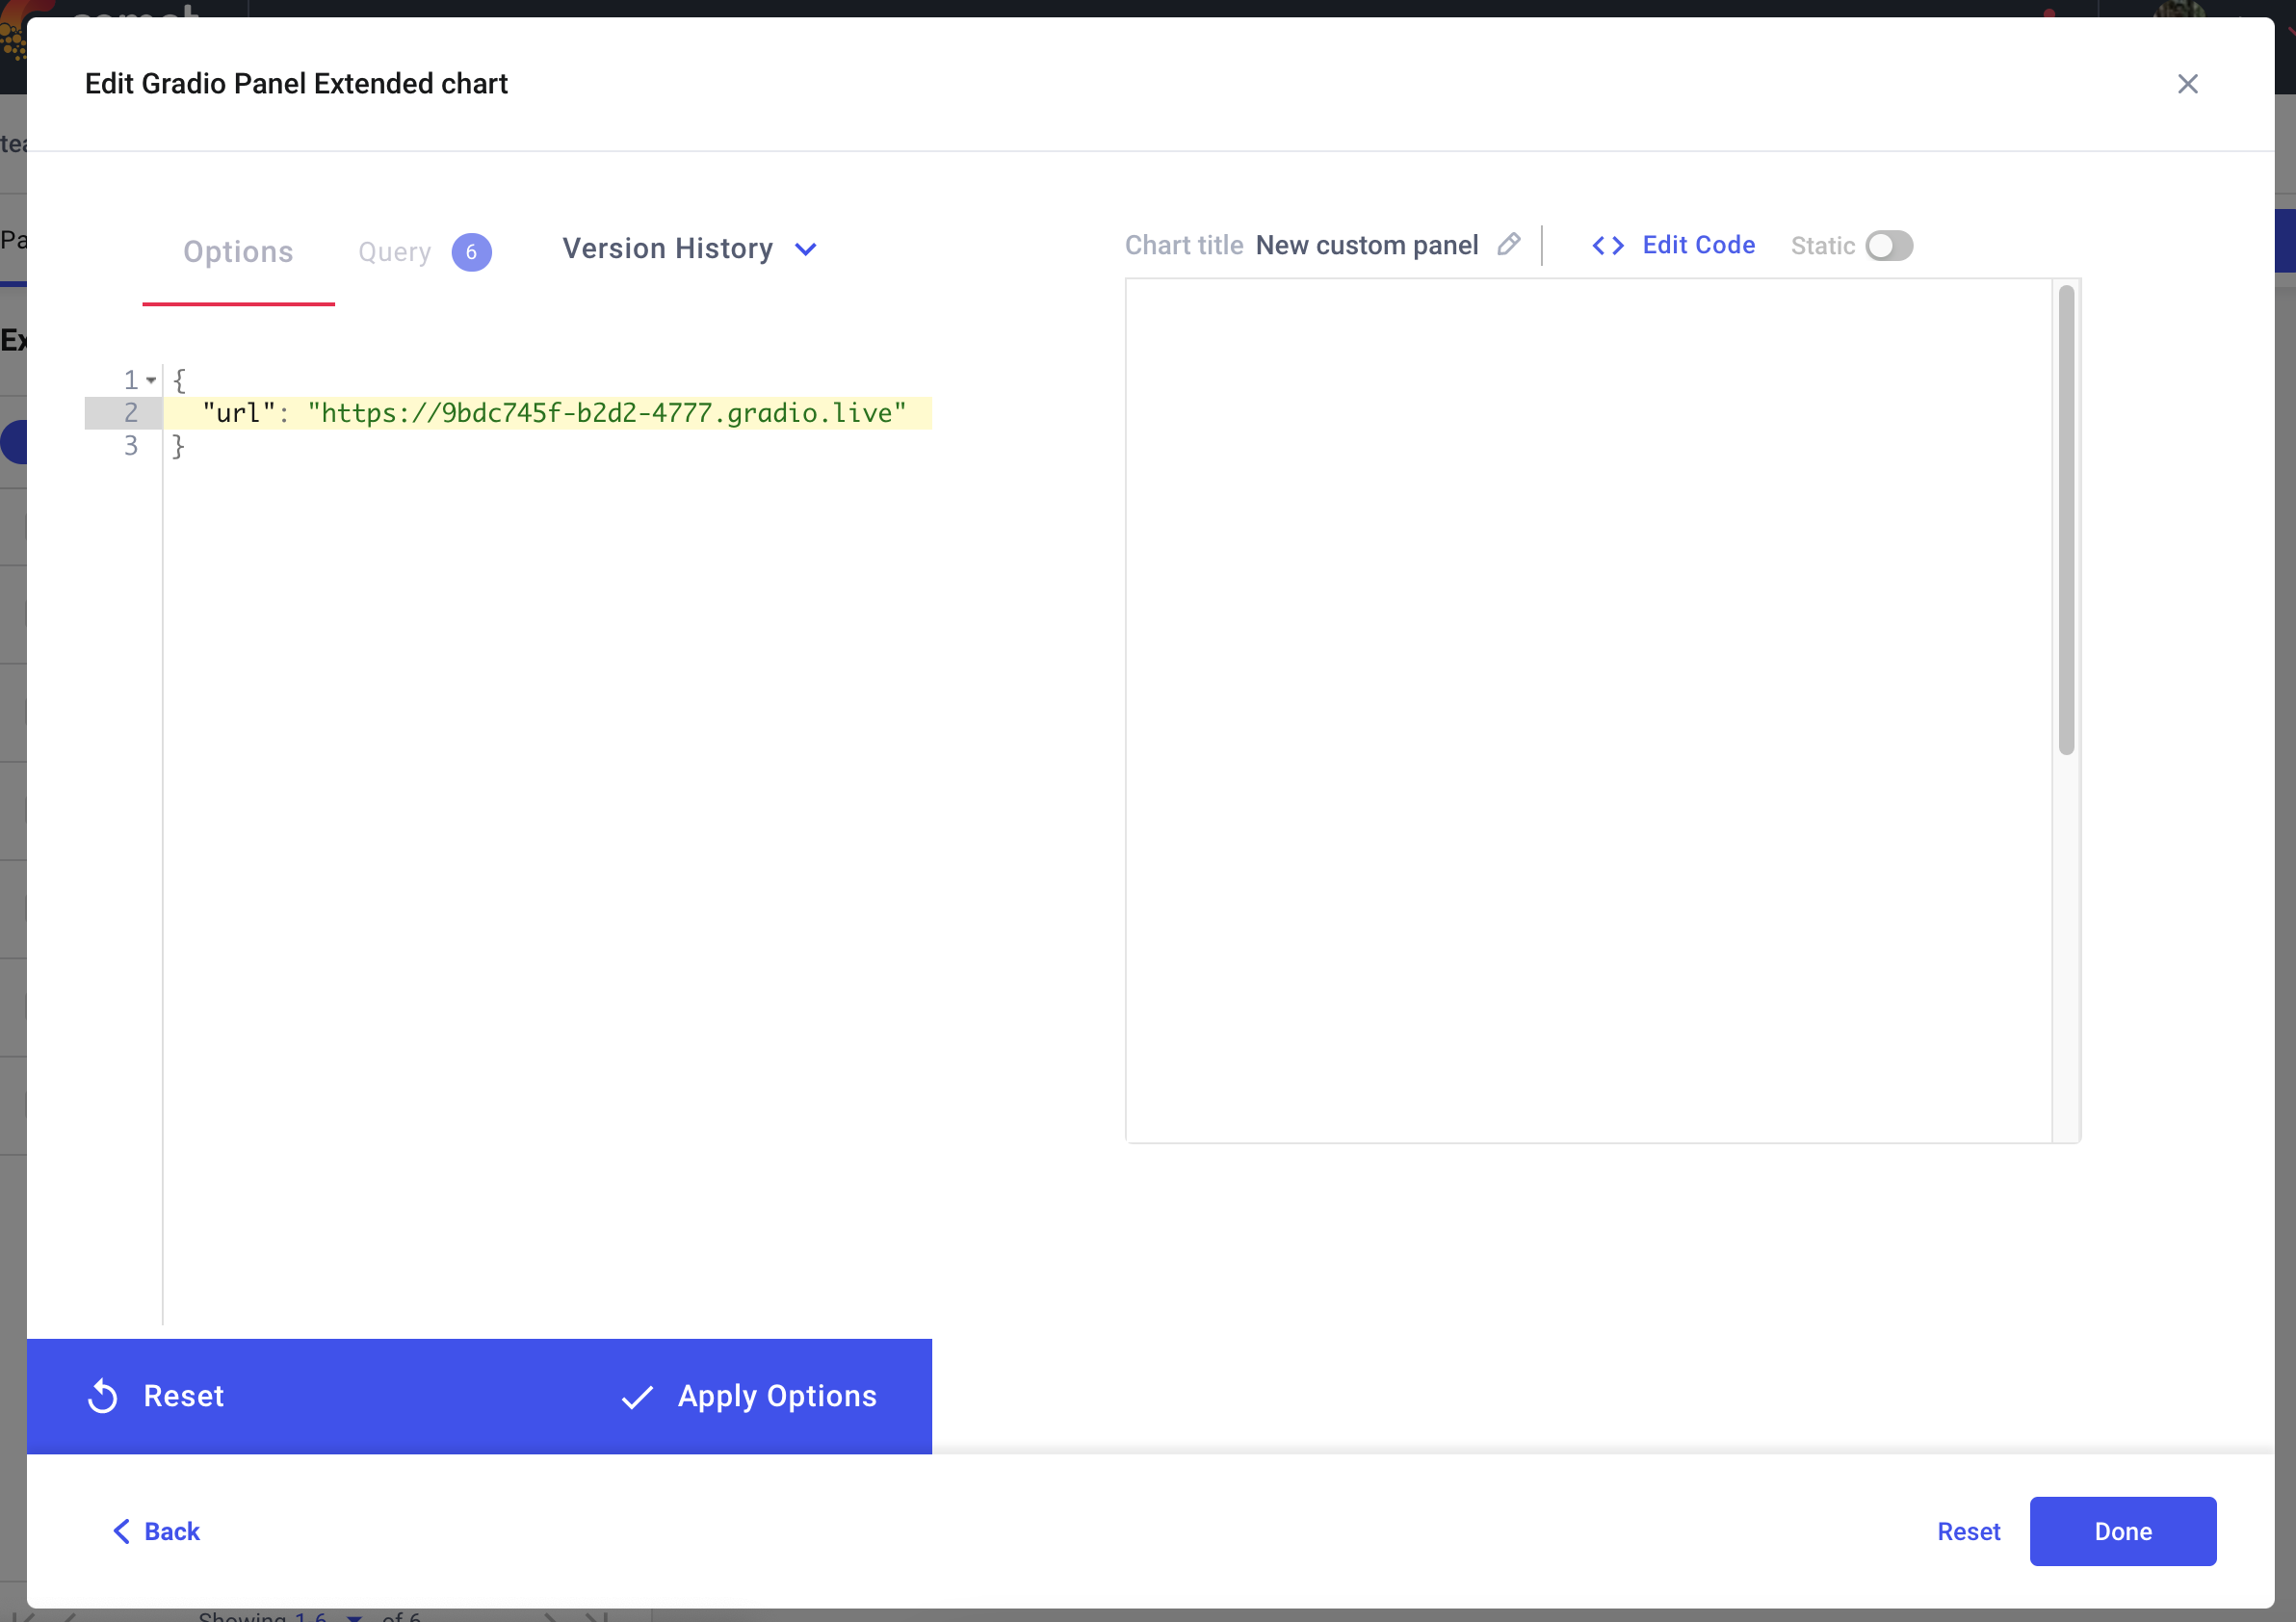
添加面板后,单击 编辑 以访问“面板选项”页面并粘贴您的 Gradio 应用程序的 URL。
您还可以使用 Hugging Face Spaces 面板将托管在 Hugging Face Spaces 上的 Gradio 应用程序嵌入到您的 Comet 项目中。
转到您的 Comet 项目页面,然后前往“面板”选项卡。单击 + 添加 按钮以调出“面板搜索”页面。接下来,在“公共面板”部分搜索“Hugging Face Spaces 面板”,然后单击 添加。
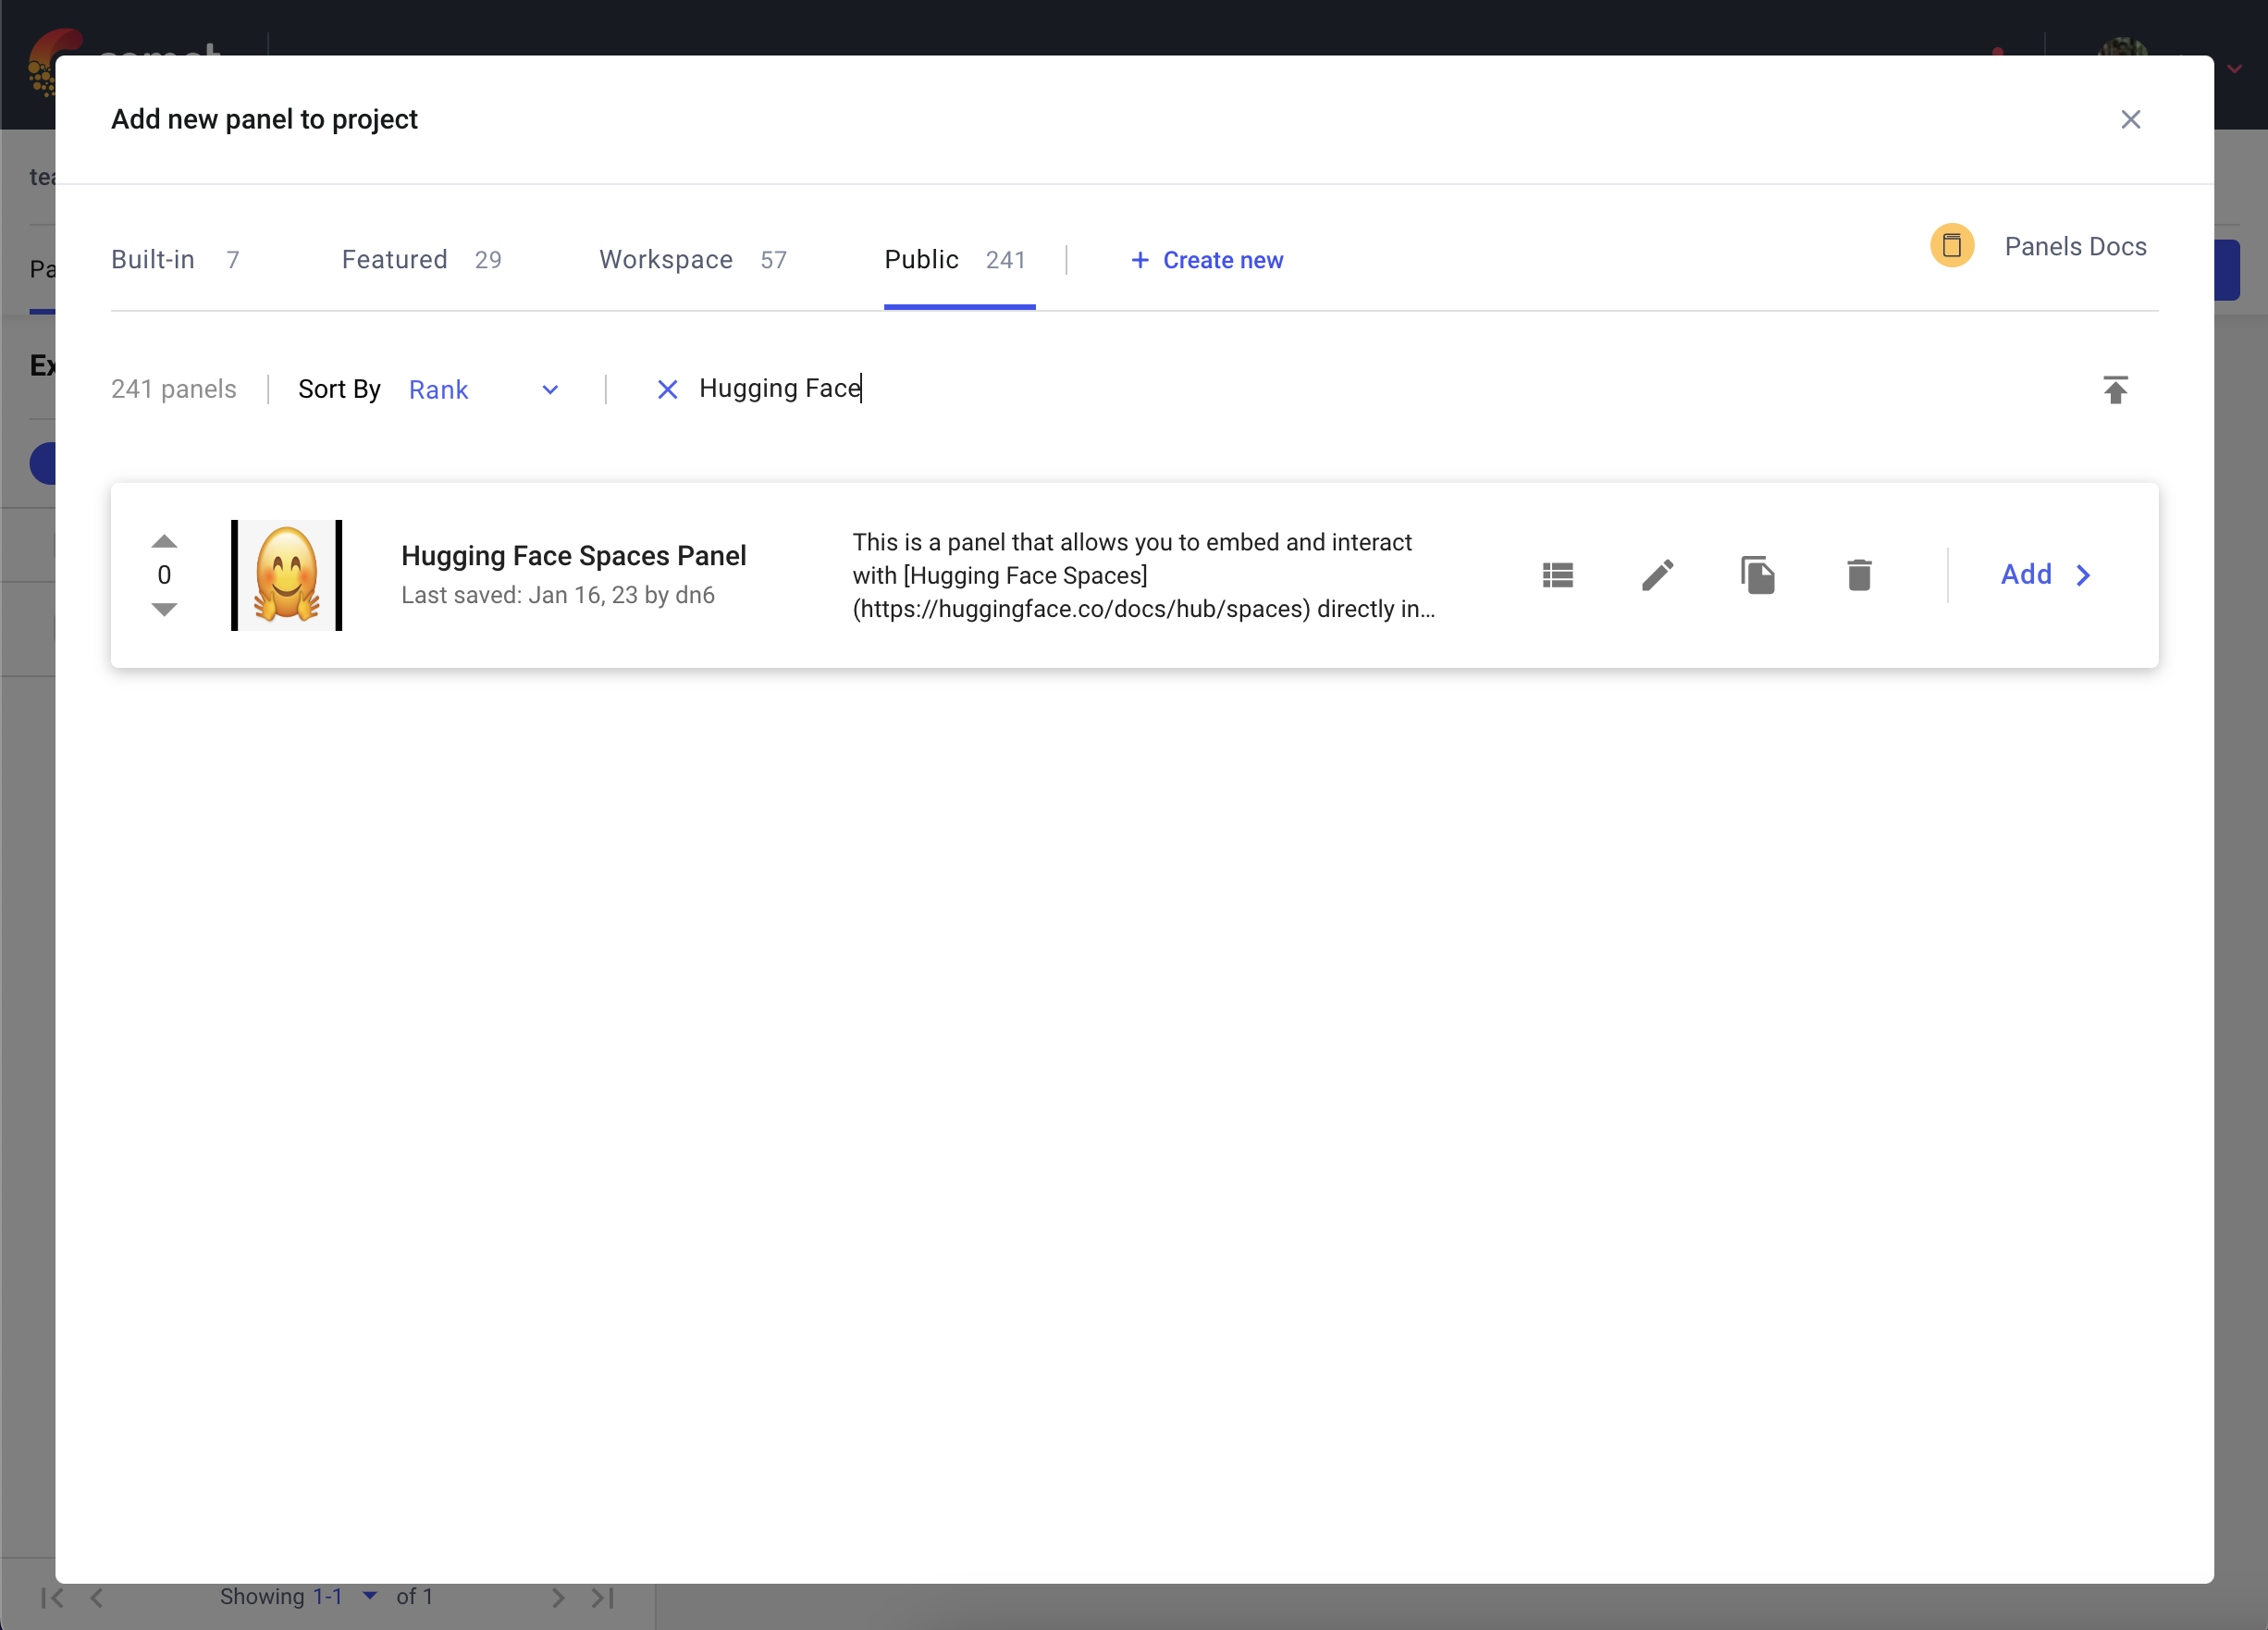
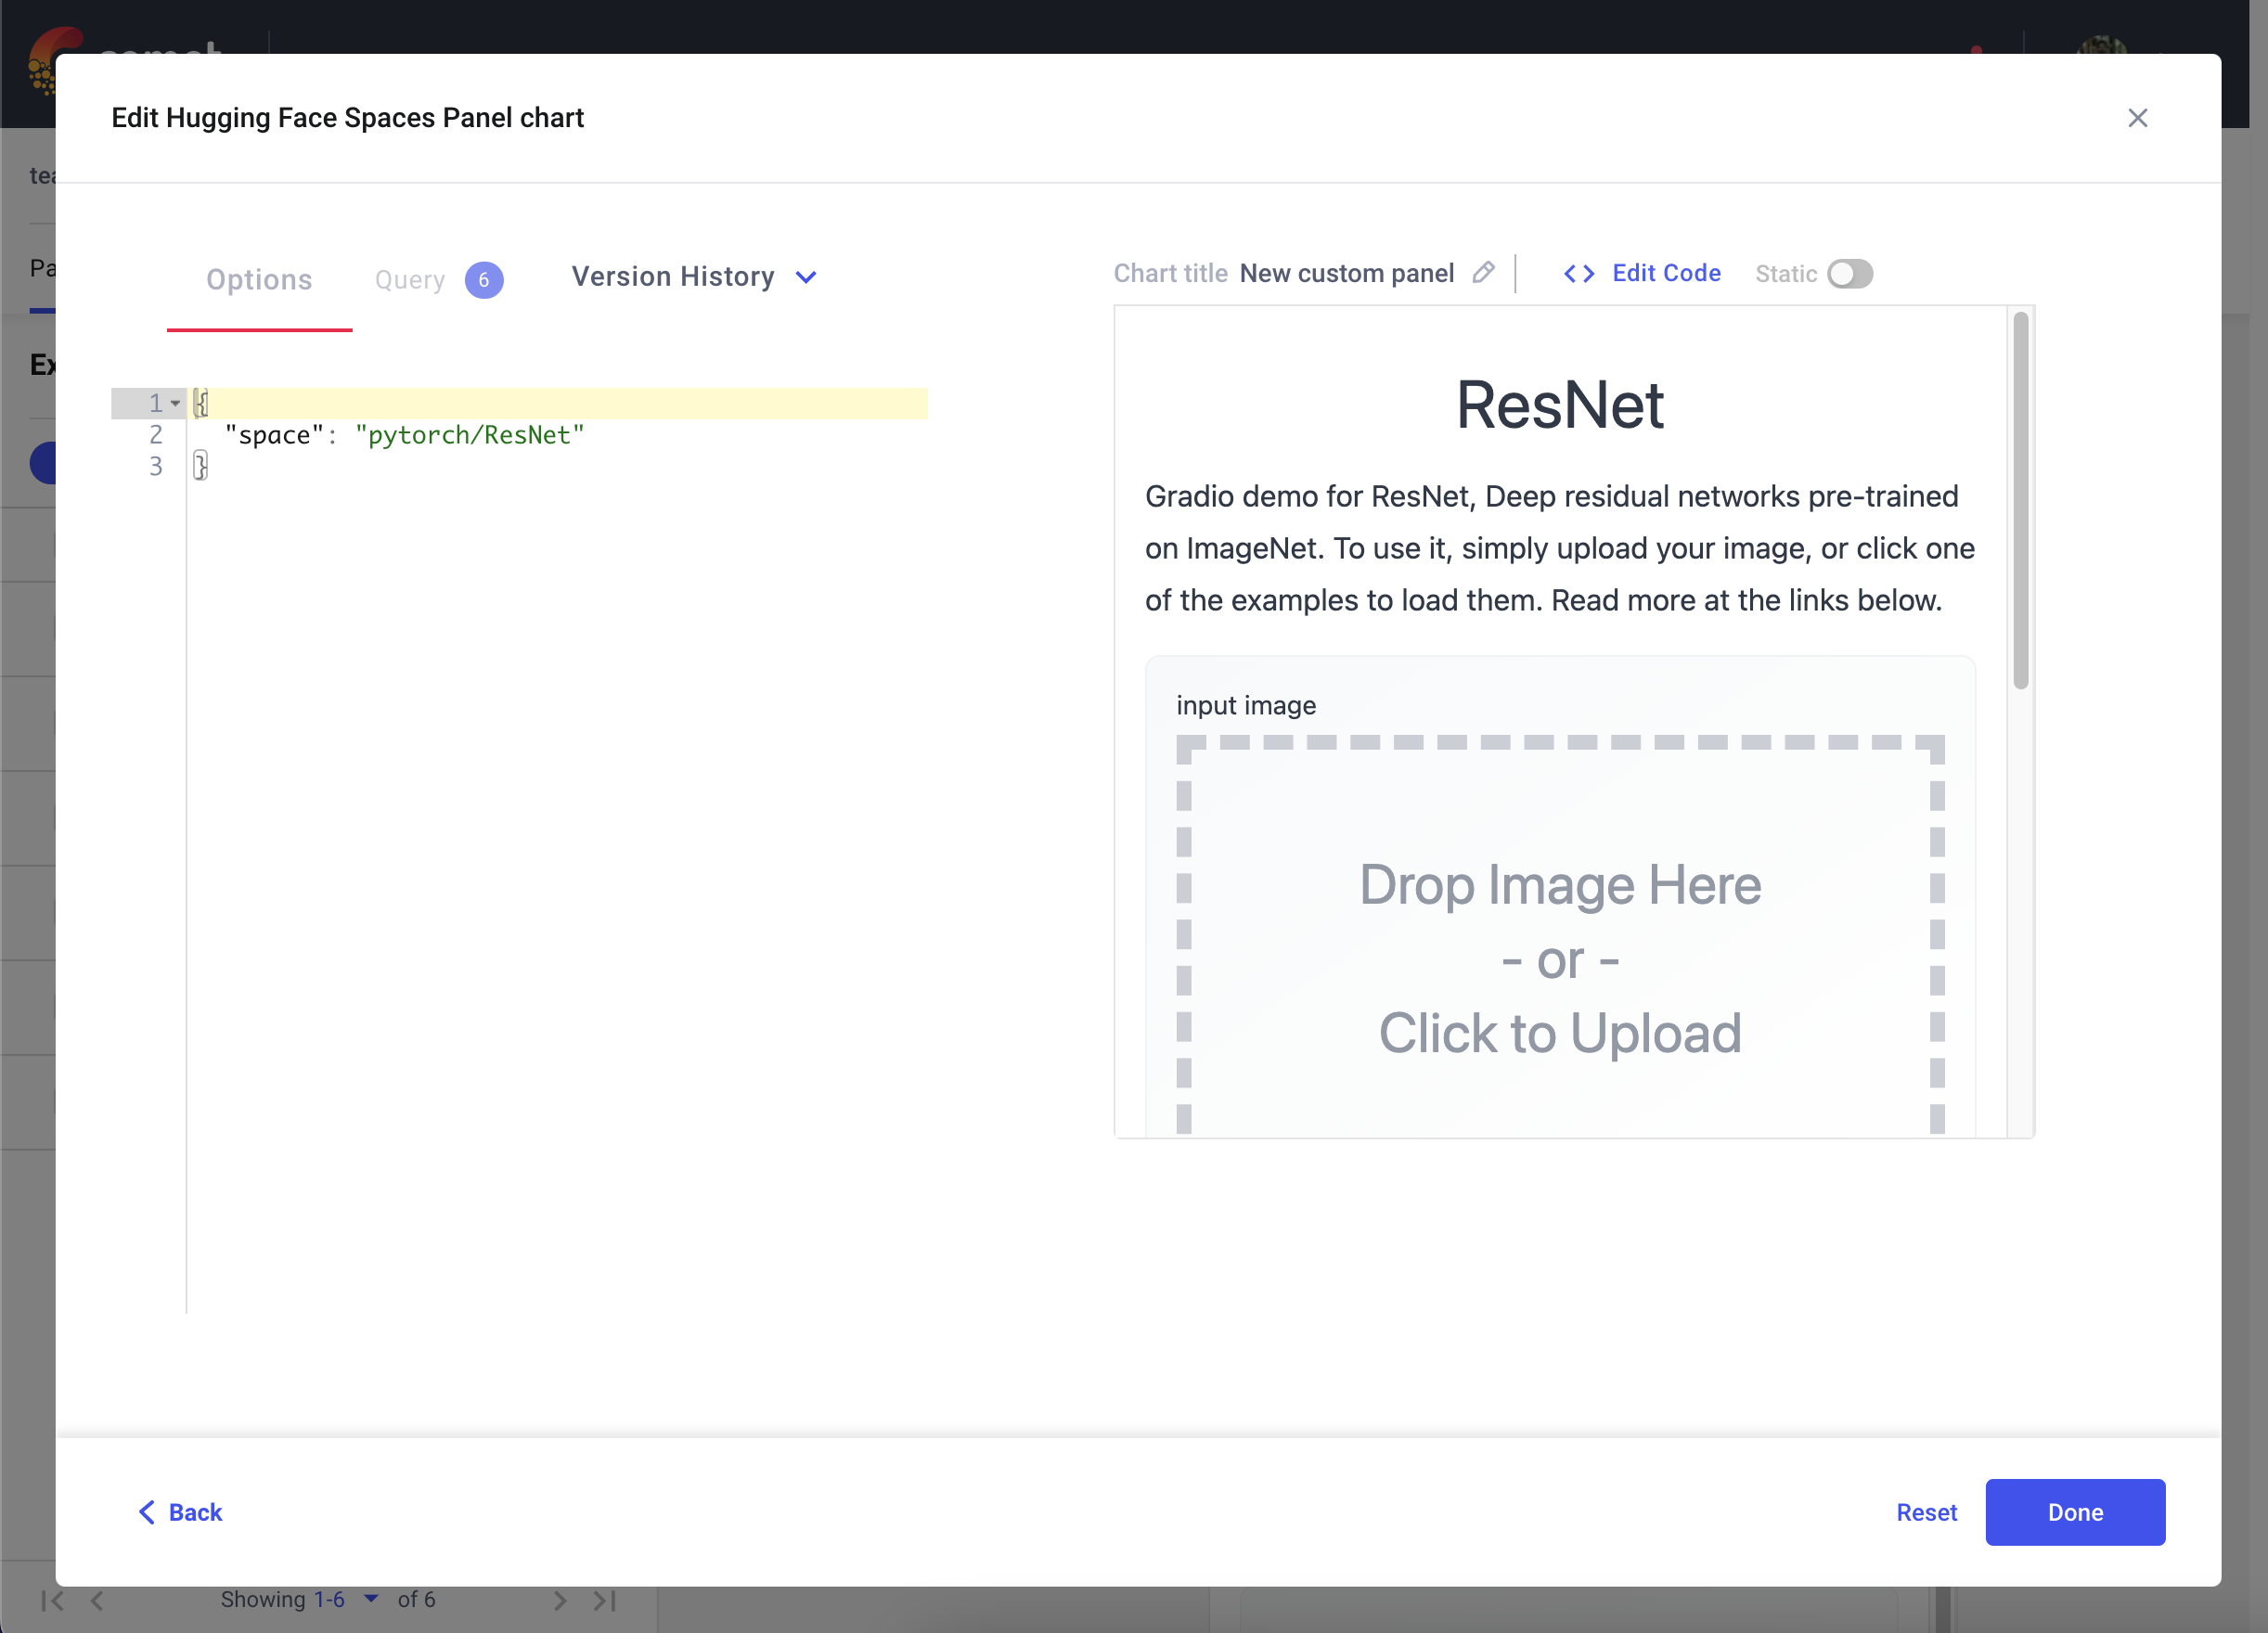
添加面板后,单击“编辑”以访问“面板选项”页面并粘贴您的 Hugging Face Space 的路径,例如 pytorch/ResNet
![]()
在前面的示例中,我们演示了通过 Comet UI 与 Gradio 应用程序交互的各种方式。此外,您还可以将模型推理(例如 SHAP 图)从 Gradio 应用程序记录到 Comet。
在以下代码片段中,我们将记录文本生成模型的推理。我们可以使用 Gradio 的状态管理对象,在多次推理调用中持久化一个实验。这将允许您将模型的多次推理记录到单个实验中。
import comet_ml
import gradio as gr
import shap
import torch
from transformers import AutoModelForCausalLM, AutoTokenizer

if torch.cuda.is_available():
    device = "cuda"
else:
    device = "cpu"

MODEL_NAME = "gpt2"

model = AutoModelForCausalLM.from_pretrained(MODEL_NAME)

# set model decoder to true
model.config.is_decoder = True
# set text-generation params under task_specific_params
model.config.task_specific_params["text-generation"] = {
    "do_sample": True,
    "max_length": 50,
    "temperature": 0.7,
    "top_k": 50,
    "no_repeat_ngram_size": 2,
}
model = model.to(device)

tokenizer = AutoTokenizer.from_pretrained(MODEL_NAME)
explainer = shap.Explainer(model, tokenizer)


def start_experiment():
    """Returns an APIExperiment object that is thread safe
    and can be used to log inferences to a single Experiment
    """
    try:
        api = comet_ml.API()
        workspace = api.get_default_workspace()
        project_name = comet_ml.config.get_config()["comet.project_name"]

        experiment = comet_ml.APIExperiment(
            workspace=workspace, project_name=project_name
        )
        experiment.log_other("Created from", "gradio-inference")

        message = f"Started Experiment: [{experiment.name}]({experiment.url})"

        return (experiment, message)

    except Exception as e:
        return None, None


def predict(text, state, message):
    experiment = state

    shap_values = explainer([text])
    plot = shap.plots.text(shap_values, display=False)

    if experiment is not None:
        experiment.log_other("message", message)
        experiment.log_html(plot)

    return plot


with gr.Blocks() as demo:
    start_experiment_btn = gr.Button("Start New Experiment")
    experiment_status = gr.Markdown()

    # Log a message to the Experiment to provide more context
    experiment_message = gr.Textbox(label="Experiment Message")
    experiment = gr.State()

    input_text = gr.Textbox(label="Input Text", lines=5, interactive=True)
    submit_btn = gr.Button("Submit")

    output = gr.HTML(interactive=True)

    start_experiment_btn.click(
        start_experiment, outputs=[experiment, experiment_status]
    )
    submit_btn.click(
        predict, inputs=[input_text, experiment, experiment_message], outputs=[output]
    )
此代码片段的推理将保存在您的实验的 HTML 选项卡中。
我们希望本指南对您有所帮助,并为您提供了与 Comet 和 Gradio 一起构建出色模型评估工作流的灵感。